Durandal
GENERAL TIPS:
The Durandal levels are known for their Wasps, Hounds (Especially in FFFFF), and Cyborgs (Also known as Assimilated Civilians). Beware!!
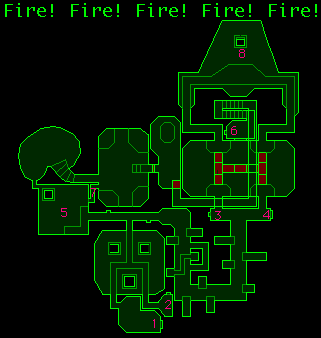
1. This is where you start in Fire! Fire! Fire! Fire! Fire! Read the terminal (If you want) and go on.
2. You can recharge your health, if needed, here.
3. Another place to recharge.
4. Save yer game if you want.
5. You need to go INTO the fire to beat FFFFF. Quickly jump into this pit, and run through the
narrow hall (Upper left hand corner of room behind the pillar). Be ready to kill Wasps, they'll
fly right up into your face as you come in.
6. Activate this switch to raise the "H" Platform.
7. Come through this narrow hall, and be prepared to jump directly from this hall onto the raised platform. If you land in the fire you're dead meat.
8. This is the end of the level. On to CSFCC!
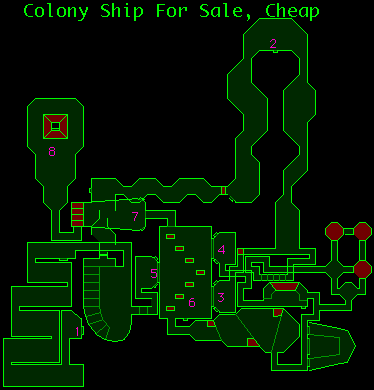
1. You start here. As you go through the halls to #2, be prepared for Hounds!!
2. Health Recharger here. You'll need it!
3, 4, 5, 6.
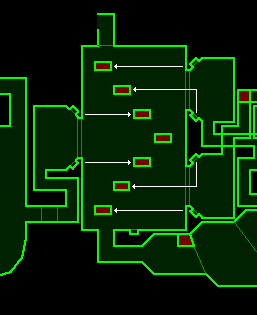
Thanks to rendererer@aol.com, from whom I stole this PICT.
The first platform (the one on the bottom) should be set high but still low enough for you to walk onto from the ground. Set the 2nd, and 3rd platform like the first, but slightly higher each time. Make them high enough each time so that you can get up to the 4th platform. Make the 5th, 6th, and 7th platforms all at same height as the hall (slightly above the 7th platform).
When you are satisfied that it is good, go up onto the 1st, 2nd, 3rd platform (Use your RUN key) and then the fourth. STOP on the fourth. Launch a grenade at the switch in the wall (The switch by the 1st platform, slightly right). The fourth platform (The on you are on) will rise. Run onto the 5th, 6th, and 7th, and then into the hall. If you are unsuccessful, try again! If you set the platforms too high/low, you'll need to go back to the appropriate rooms and change them.
Good Luck!
7. Activate both switches, then run onto the platform that is level with the ground. Once up, kill all the aliens, and come back down and activate the switches again (This time be sure to activate the right switch first, then the left).
8. If you do #7 fast enough, you'll be able to run onto the platform before it rises back up. If you didn't make it, go activate the switches again (Remember; right first!) and try again.
Note: You may need to make your window a bit bigger to see this map, it's huge!
1. You start here. Read the terminal if ya want, and continue.
2. Activate this switch, and continue on
3. Yep, you need to go into the fire again. Make sure you have enough health to survive it. Go through quickly and activate the switch. Be ready to run off the platform that emerges, because it goes up then down again quickly. In the next room, Save your game (You'll need it), and go into the south hall.
4. What you'll need to do is activate the switch (that'll take the platform you're standing on DOWN into the fire), get the doo-hickey in the fire, and take the elevator (Upper right hand corner of room) back up. I stole some tips from Marathon FAQ on how to do this:
To get the alien energy converter (that 'thing' in the lava), you
first need to go up to the top level as described above. When
you get to the room that has the one pillar in the lava and a save
terminal, look around on the upper level and you'll find a button.
Pressing the button will cause the pillar to drop and will allow
you to grab the device. However, to get out of the lava you either
need to grenade jump or wait for the pillar to start to rise again.
Watch that you don't get squished by the pillar! Here's some more
advice by Anthony R. Stevens (STEVENSA@AUSVM1.VNET.IBM.COM):
At the top level on the ledge with the switch that
lowers the pillar into the lava, hit the switch then
IMMEDIATELY walk off the ledge to the save terminal and
save your game. What does this do for you? You can
now, at your leisure, time your fishing expedition in the
lava so that you can jump in, get the converter, and jump
out as the pillar is rising. WAY COOL. No stress.
Nicolas Godbout (nicg@godbout.interax.net) also offers the following advice:
There's a way to save your shield when you fetch the alien
energy converter in the lava pool. Go towards the shield recharger nearest to your arrival point, continue in the long corridor. There you can see the alien thingy in the lava. Shoot at the switch directly in front of you. This opens another passage through the lava. When you're in the room with the mobile corner in the lava, shoot the switch way up there (it can be reached with the fusion gun) or activate the switch if you're at its level. Instead of jumping through that new opening, take the corridor to the south that leads to the first switch you activated. When you jump in the lava from there, you only have a ONE-way trip to make. This cuts your simmering time in half. I believe this is the way Bungie wanted you to complete the level.
Another tip by Frank McIntyre (frankmci@clark.net):
I have a different way to activate the moving pillar in
the lava. Before I had found the elevator in the shield
generator room, I discovered that I could hit the switch
to activate the column by standing in the hall directly
opposite. If you stand back just far enough that you
can't see the switch, you can hit it with a grenade or
high energy pistol bolt. You have to carefully align
your gun with the switch before you lose sight of it.
It takes a few practice shots, but when you have hit
it, you will hear the faint *click* that the switches
make from a distance. The main advantage of doing it
this way is that it is easier to time your run into the
lava, thus reducing the chance of getting fried.
5. Activating this switch will cause a platform to come up to allow you to pass across the fire pit unharmed. It's fast, though, so when you activate the switch, be ready to run quickly across. If you DO fall in the pit, you have no other choice that to try to grenade hop out before you die.
6. Kill all the aliens from this point, first. There are some that hide behind the right pillar, so be on the lookout.
7. You'll need to RUN off the ledge right onto the narrow ledge of this pillar. It's hard to do, and unforgiving. Once you do make it, walk carefully around to the back, and take the elevator up.
8. Take the stairs up. Try real hard not to fall! If you do, you'll need to do steps 5-7 again!
9. Activate this switch and continue.
10. Run across, but STOP on the middle pillar. The reason for this is because you need to open the door (The one past the third pillar), by taking the hall to the right of the middle pillar.
11. There is two ways you can do this part:
a) This is how Bungie figured you'd do it: At the end of this room (Where the end of the hall meets the big room below), there is a hall to the left, slightly lower than the hall you're standing in. You need to try to run from where you're standing to that room. It's kinda hard.
b) The secret way. There is a secret door where the pink "X" is on the map. Open that door, and activate the switch to your left. Simple!
12, 13. After you activate the switch here, you'll need to go back to the room of the three pillars (You know, in step 10.) and you'll notice that door past the third pillar is now open. Run from the second pillar to the third, and then into the hall where the door used to be.
14. You'll need to RUN (It may help if you back up a little) from this hall to step 15, where the Terminal is.
15. Read the terminal, and you'll be transported to "Neither High Nor Low"
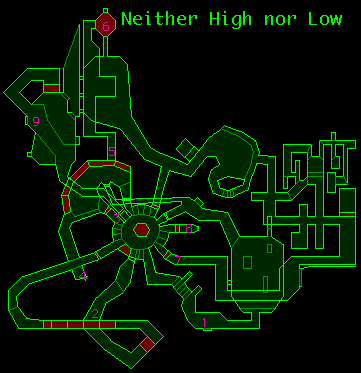
1. This is where you start in "Neither High nor Low". Read the terminal if ya want and go on.
2. This is probably the hardest part of this level. You need to eventually get past all the platforms that crush you. You can do this either by running straight at #2, and taking the loop to the right-most platform, or you can hang a sharp right when you step into the platform.
3. Try hard not to fall. It's a pain in the butt if you do.
4. Activate this switch to make all the platforms in the room right north of you move up.
5. Go down into this hall.
6. Take this platform up, and activate the switch on the one side of the top of the platform by firing a grenade at it. Take the hall off the elevator.
7. I just made this a step, since it's pretty tough to get through the maze of halls from step 6 to here.
8. This is a bit tricky. You'll need to activate this switch, turn around and get onto the hexagonal platform that is moving up. You may find it helpful to activate this switch from farther away by using the grenade launcher.
9. Read this terminal, and you're on to the next chapter in Marathon, "The Pfhor"!
GENERAL TIPS:
The Durandal levels are known for their Wasps, Hounds (Especially in FFFFF), and Cyborgs (Also known as Assimilated Civilians). Beware!!
1. This is where you start in Fire! Fire! Fire! Fire! Fire! Read the terminal (If you want) and go on.
2. You can recharge your health, if needed, here.
3. Another place to recharge.
4. Save yer game if you want.
5. You need to go INTO the fire to beat FFFFF. Quickly jump into this pit, and run through the
narrow hall (Upper left hand corner of room behind the pillar). Be ready to kill Wasps, they'll
fly right up into your face as you come in.
6. Activate this switch to raise the "H" Platform.
7. Come through this narrow hall, and be prepared to jump directly from this hall onto the raised platform. If you land in the fire you're dead meat.
8. This is the end of the level. On to CSFCC!
1. You start here. As you go through the halls to #2, be prepared for Hounds!!
2. Health Recharger here. You'll need it!
3, 4, 5, 6.
Thanks to rendererer@aol.com, from whom I stole this PICT.
The first platform (the one on the bottom) should be set high but still low enough for you to walk onto from the ground. Set the 2nd, and 3rd platform like the first, but slightly higher each time. Make them high enough each time so that you can get up to the 4th platform. Make the 5th, 6th, and 7th platforms all at same height as the hall (slightly above the 7th platform).
When you are satisfied that it is good, go up onto the 1st, 2nd, 3rd platform (Use your RUN key) and then the fourth. STOP on the fourth. Launch a grenade at the switch in the wall (The switch by the 1st platform, slightly right). The fourth platform (The on you are on) will rise. Run onto the 5th, 6th, and 7th, and then into the hall. If you are unsuccessful, try again! If you set the platforms too high/low, you'll need to go back to the appropriate rooms and change them.
Good Luck!
7. Activate both switches, then run onto the platform that is level with the ground. Once up, kill all the aliens, and come back down and activate the switches again (This time be sure to activate the right switch first, then the left).
8. If you do #7 fast enough, you'll be able to run onto the platform before it rises back up. If you didn't make it, go activate the switches again (Remember; right first!) and try again.
Note: You may need to make your window a bit bigger to see this map, it's huge!
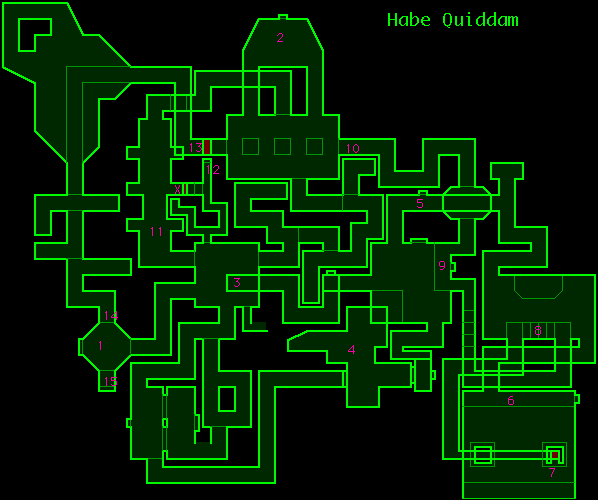
1. You start here. Read the terminal if ya want, and continue.
2. Activate this switch, and continue on
3. Yep, you need to go into the fire again. Make sure you have enough health to survive it. Go through quickly and activate the switch. Be ready to run off the platform that emerges, because it goes up then down again quickly. In the next room, Save your game (You'll need it), and go into the south hall.
4. What you'll need to do is activate the switch (that'll take the platform you're standing on DOWN into the fire), get the doo-hickey in the fire, and take the elevator (Upper right hand corner of room) back up. I stole some tips from Marathon FAQ on how to do this:
To get the alien energy converter (that 'thing' in the lava), you
first need to go up to the top level as described above. When
you get to the room that has the one pillar in the lava and a save
terminal, look around on the upper level and you'll find a button.
Pressing the button will cause the pillar to drop and will allow
you to grab the device. However, to get out of the lava you either
need to grenade jump or wait for the pillar to start to rise again.
Watch that you don't get squished by the pillar! Here's some more
advice by Anthony R. Stevens (STEVENSA@AUSVM1.VNET.IBM.COM):
At the top level on the ledge with the switch that
lowers the pillar into the lava, hit the switch then
IMMEDIATELY walk off the ledge to the save terminal and
save your game. What does this do for you? You can
now, at your leisure, time your fishing expedition in the
lava so that you can jump in, get the converter, and jump
out as the pillar is rising. WAY COOL. No stress.
Nicolas Godbout (nicg@godbout.interax.net) also offers the following advice:
There's a way to save your shield when you fetch the alien
energy converter in the lava pool. Go towards the shield recharger nearest to your arrival point, continue in the long corridor. There you can see the alien thingy in the lava. Shoot at the switch directly in front of you. This opens another passage through the lava. When you're in the room with the mobile corner in the lava, shoot the switch way up there (it can be reached with the fusion gun) or activate the switch if you're at its level. Instead of jumping through that new opening, take the corridor to the south that leads to the first switch you activated. When you jump in the lava from there, you only have a ONE-way trip to make. This cuts your simmering time in half. I believe this is the way Bungie wanted you to complete the level.
Another tip by Frank McIntyre (frankmci@clark.net):
I have a different way to activate the moving pillar in
the lava. Before I had found the elevator in the shield
generator room, I discovered that I could hit the switch
to activate the column by standing in the hall directly
opposite. If you stand back just far enough that you
can't see the switch, you can hit it with a grenade or
high energy pistol bolt. You have to carefully align
your gun with the switch before you lose sight of it.
It takes a few practice shots, but when you have hit
it, you will hear the faint *click* that the switches
make from a distance. The main advantage of doing it
this way is that it is easier to time your run into the
lava, thus reducing the chance of getting fried.
5. Activating this switch will cause a platform to come up to allow you to pass across the fire pit unharmed. It's fast, though, so when you activate the switch, be ready to run quickly across. If you DO fall in the pit, you have no other choice that to try to grenade hop out before you die.
6. Kill all the aliens from this point, first. There are some that hide behind the right pillar, so be on the lookout.
7. You'll need to RUN off the ledge right onto the narrow ledge of this pillar. It's hard to do, and unforgiving. Once you do make it, walk carefully around to the back, and take the elevator up.
8. Take the stairs up. Try real hard not to fall! If you do, you'll need to do steps 5-7 again!
9. Activate this switch and continue.
10. Run across, but STOP on the middle pillar. The reason for this is because you need to open the door (The one past the third pillar), by taking the hall to the right of the middle pillar.
11. There is two ways you can do this part:
a) This is how Bungie figured you'd do it: At the end of this room (Where the end of the hall meets the big room below), there is a hall to the left, slightly lower than the hall you're standing in. You need to try to run from where you're standing to that room. It's kinda hard.
b) The secret way. There is a secret door where the pink "X" is on the map. Open that door, and activate the switch to your left. Simple!
12, 13. After you activate the switch here, you'll need to go back to the room of the three pillars (You know, in step 10.) and you'll notice that door past the third pillar is now open. Run from the second pillar to the third, and then into the hall where the door used to be.
14. You'll need to RUN (It may help if you back up a little) from this hall to step 15, where the Terminal is.
15. Read the terminal, and you'll be transported to "Neither High Nor Low"
1. This is where you start in "Neither High nor Low". Read the terminal if ya want and go on.
2. This is probably the hardest part of this level. You need to eventually get past all the platforms that crush you. You can do this either by running straight at #2, and taking the loop to the right-most platform, or you can hang a sharp right when you step into the platform.
3. Try hard not to fall. It's a pain in the butt if you do.
4. Activate this switch to make all the platforms in the room right north of you move up.
5. Go down into this hall.
6. Take this platform up, and activate the switch on the one side of the top of the platform by firing a grenade at it. Take the hall off the elevator.
7. I just made this a step, since it's pretty tough to get through the maze of halls from step 6 to here.
8. This is a bit tricky. You'll need to activate this switch, turn around and get onto the hexagonal platform that is moving up. You may find it helpful to activate this switch from farther away by using the grenade launcher.
9. Read this terminal, and you're on to the next chapter in Marathon, "The Pfhor"!