
Polygons are what make up the whole map walking area. If you don't have any polygons, then you don't have a map. Thankfully Marathon2 allows more polygons for a level than Marathon1 did. A total of 1023 polygons is allowable for each level. This chapter will cover making and editing polygons and there textures. This is only part of the whole process, however.
Polygons are points and lines grouped together to make a form. No polygon can have less than three points or more than eight points. Also, polygons must be plotted down in a clockwise direction, failing to do so will make a "Bad Poly", and will cause Bad Problems. If you have any questions about a polygon, just try drawing one and hopefully you will understand what I mean.
Before testing a Level in Marathon, make sure you have at LEAST 3 polygons in the Level. You can run the map with only one, but let's get real, no one makes a map with just one polygon.
__________________________________________________________________
THE TOOLS PALETTE:
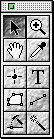
polygons, objects, and so forth. The following is a description of each tool from
left to right, top down.
• Arrow/Pointer Hot key: command
It is used for selecting everything in a map. When the tool
moves over the map it sub-highlights the various things it can select (makes
object borders move in a dotted line fashion, marching ants). This is very
useful because it would be real hard to select things if you didn't know what was
going to be selected first. This tool is also used for dragging points of polygons and
polygons themselves. You can also drag around object points too.

command-option-space zoom-out
Hot key(when tool selected): option zoom-out
The Magnifying glass works very well now, and when you have it selected, the option key will change it to a minus magnifier(zoom out). You can also use the menu "View".

The hand tool is a really helpful awesome tool for those of us who don't own a huge monitor. You can drag the screen around with the press of the space at any given time. Really helpful.

The dropper picks up current information on a polygon and makes it the default for the next made polygon. Not recommended, because it causes crashing maps. Use the "Make Default" button on the polygon inspector instead, it's stabler.

Putting down objects, sound points, weapons, monsters, and player starting positions, is done with this tool. This is a very used tool. Once you click on the map in a polygon using this tool, the inspector changes to the object inspector (more in chapter "Object Placement").

Fairly buggy, and I get mixed results. When it works, it is supposed to put messages down on maps so when a player views the map during the game, they can read it.

This is the life blood. You place points down for a polygon with this tool. First click on a blank area, or an existing point and continue from there. make sure to place points down in a clockwise manner (more later).

For when you want to create polygons with lines only. With this tool you can place down a rough outline of your map, then go in and refine it more by placing inner walls, pillars, and obstructions. Then after that you can start filling in the outlines by dividing them up into polygons. This was suggested by Steve himself, but I suggest against it due to the fact that it creates more problems than it simplifies.

This pounds a point into a line/side of a polygon, and also pounds out a point, by holding the option key down. To use, move the tool over a line, and when the line highlights, click. A new point in the polygon should appear. This tool only adds points if there isn't already eight points in a polygon, and that the side you are pounding is actually a side, and not a center line. Also with this tool, you can disconnect polygons by selecting and dragging the points that connect two polygons together. This is helpful for adding stuff in, and not wanting to erase a polygon. Also, you can join points by clicking and dragging a point near or on top of another point. It will then join that point to the other, and join sides if necessary. THIS IS MY FAVORITE TOOL!

If you use graphics programs, then you might have an idea what this does, wrong. This is to make any clicked upon polygons/sides match the default polygon/side. Buggy when it changes the height of a polygon (it doesn't get rid of unneeded side textures). Also many times than not, this will create a crashing map, so don't use this tool at all.
For reference, do not use any tool on the right side of the tool palette except the zoom tool. The other four tools create headaches, unless your feeling gutsy.
__________________________________________________________________
MAKING A POLYGON:
The first thing you do is grab the poly tool and then click on the gray grid window. Then click a few more like the picture below:
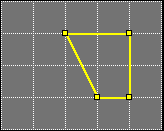
The yellow line that is created when you plot points is what
the polygon will look like if you close it now. Double clicking
the last point or clicking on the first point, closes the poly.
It then fills in with a texture and the Inspector changes to
the Polygon Inspector. --IMPORTANT-- Double clicking to
close a polygon creates zero length lines which crash 040's
if they do not use the Ignore zero divides app.
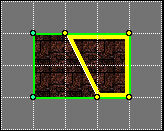
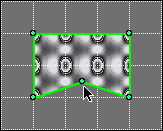
This picture shows two polygons joined together, and one is
selected. Selected polygons have a thick yellow line inside
the borders. Once a polygon is selected you can change its
attributes with the inspector (below)
The Inspector is where most modifications take place for any polygon, side, or object.
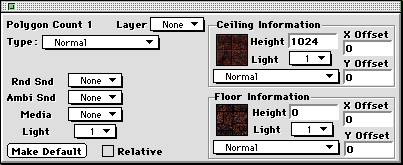
• Polygon Count: Is how many polygons you have in the current level. Do not exceed 1023 polygons. I have never seen Bungie go over 500, so you really don't have to worry about it. 500 Polygons are a lot, and very hard to do, unless you make some really huge solo levels. My solo levels had up to 800 in them.
• Layer: This is for putting certain polygons in a layer group, so you can view the map easily. If you make a multi layer map that has lots of passageways over passageways, then using the layers will help you view under, and change polygons that are beneath another. You view layers through the "View" menu, by selecting which layers you want shown. The layers turn off everything for a polygon, so in order to connect points and lines or whatever, you will need to show the layer than the target polygon is on.
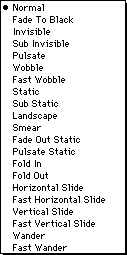
• Type

The descriptions of the popup follows:
• Normal: Plain and simple polygon.
• Item Impassable: Makes it to where an item/monster will not
randomly appear in this polygon. Used to control the
randomness of items.
• Monster Impassable: Makes it so no aliens will cross into
the polygon. It also makes it so no aliens OR items will
randomly appear in the polygon. Used to control the pesky
aliens from appearing in switch holes or windows, etc.
• Hill: Used to designate a hill for net games.
• Base: Does Nothing, don't use it.
• Platform: Makes the selected polygon into a platform
(refer to chapter "Platforms")
• Light On Trigger: Activates a light when a Player steps into
the polygon. An additional popup appears when this is selected,
so you can choose which light.
• Platform On Trigger: This activates a platform when a
player steps into the polygon. After selecting this, hold cmd-optn down, and then
select the platform on your map that you want to activate. Sometimes during making the
map, you might want to delete a made polygon...if you do this, make sure you check all
platform activation switches and polygons. Selecting a platform to activate is easy to do.
Just hold cmd-optn. The platform should turn all yellow when it's the destination.
• Light Off Trigger: Same as Light On Trigger.
• Platform Off Trigger: Same as Platform On Trigger.
• Teleporter: Makes the polygon into a teleporter. When the player stops in this they
teleport to a picked destination. You pick a destination by holding down cmd-optn,
then select the destination polygon. Make sure you have first selected the teleporter
polygon. The chosen polygon should turn all yellow when it's a destination.
• Zone Border: It is supposed to designate where the Visible, Invisible, Dual, and Item
Triggers end, as well as sound travel regarding alien activation. See below "Zones"
section of this chapter for more info.
• Goal: Not used. Don't mess with it.
• Visible Trigger: Alerts all aliens in a given zone (using zone borders), that are not
flagged as invisible.
• Invisible Trigger: Alerts all aliens in a given zone, that are flagged "Deaf" or "Blind"
and are flagged as "Invisible".
• Dual Trigger: Triggers both Visible and Item Triggers, or both Visible and Invisible
Triggers, kind of weird how it works, but it activates a lot of things at once.
• Item Trigger: Makes any invisibly flagged items appear in a given zone.
• Must Explore: Must enter all these areas in order to leave.
• Exit: Lets you leave to next level when objectives are completed.
• Rnd Snd: A popup to choose (if any) random sounds you have made in the Edit Random Sounds dialog (see chapter "Sounds"). This sound is for this polygon only, and doesn't travel outside the polygon.
• Ambi Snd: A popup to choose (if any) ambient sounds you have made in the Edit Ambient Sounds dialog (see chapter "Sounds"). This sound is for this polygon only, and doesn't travel outside the polygon.
• Media: A popup to choose (if any) media you have made in the Edit Media Types dialog (see chapter "Media"). This media is for this polygon only, and doesn't travel outside the polygon. Make sure you make all polygons next to this with the same media, so smearing doesn't occur when a media borders no media. Hard to explain, but I am sure you will see what I mean if you get into heavy liquids (not mercury).
• Light: A popup to choose (if any) a light you have made in the Edit Lighting Types dialog (see chapter "Lighting"). This light is for the media that this polygon has (if any). If you set this light and don't have a media for the polygon, then you won't notice it at all. It's only used to give the media its light.
• Make Default: Once pushed, it will make the default the same as the polygon in the inspector at that moment. This is really helpful for making many polygons of the same type. In this version of Pfhorte, it doesn't capture all the platform data, just the polygon stuff, so you would still have to go into each platform and make it the same, or different, your choice. Make sure the first time you use Pfhorte you clear out the defaults. Do this by going in and making a default of the most basic things, set all numbers to zero (except heights). Then select "Save Settings" in the File menu to make it permanent. This helps clear any future bad polygons :-)
• Relative checkbox: This is for viewing the height of your polygon relatively. It changes the number in the ceiling height to the ACTUAL height on the room. For instance: You have a room that is at 1024 for the floor and 4096 for the ceiling. If relative is on, then the ceiling would read 3072, because that's actually how tall the room is. It also brings up a little dude standing with a line where the ceiling is to them.
• Ceiling Info: Height is where in space the ceiling is at. If relative is set, it is how tall the room actually is. The Light popup is for choosing the light for the ceiling. The texture is actually a popup menu so you can choose which texture you want for the ceiling. The Texture Attitude popup descriptions are below.
• Floor Info: Height is where in space the floor is at. If relative is set, nothing changes, it is still the floor coordinate. The Light popup is for choosing the light for the floor. The texture popup lets you choose which texture you want for the floor. The Texture Attitude popup descriptions are below.
• Ceiling/Floor Info: X/Y offset is where you can now align the texture on the floor or ceiling. This is helpful for moving a floor or ceiling around. You cannot rotate the textures...just slide them sideways, forward and backward. The play level feature now supports this, so you can now SEE what it will look like without having to load marathon.
textures, so ignore them. Many however can be used for Sides.
The ones that work are as follows:
• Normal: Plain and simple, the texture just sits there.
• Pulsate: The texture looks like it moves in and out.
• Wobble/Fast: Bounces back n forth a bit. Fast is just
faster, and kind of sickening when put in large areas.
• Landscape: Use this to make a landscape texture look like
it should. Failure to use this will cause the landscape texture
to be crammed into a single square and rendered like all other
textures, really ugly. Also, if this is set for a non landscape
texture, then it will make the texture look really funky and
kind of trippy.
• Slides: Moves the texture in a preset direction. There is no
way to change the direction other than Vertical or Horizontal.
Fast just means it moves faster.
• Wander/Fast: Makes the texture slide around in a weird
random pattern. Very good to use for liquids looks or crazed
particle beams.
The ones that don't work too well are as follows:
• Statics of any kind: They smear, and may cause crashes. Don't use them!
• Smear: The texture looks bad, period. Don't use it!
The following are used for monsters and players, and I have no idea why they are in Pfhorte:
• Fold in, Fold out
• Invisible, Sub Invisible
__________________________________________________________________
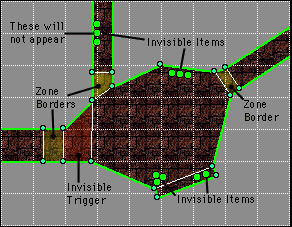
ZONES:
Making a polygon of type Zone Border is used in conjunction with trigger type polygons. To quote Starman "Zone borders are formed so that stepping on a 'visible trigger' (or any trigger for that matter) only works inside the inclusive section of the zone borders. Therefore, if you have invisible items outside the zone border, they will not become visible when you step on the trigger."(Mike Gaines) Also, the zone borders prevent sounds from aliens to be heard by other aliens outside of a border. Same goes with your weapons sounding off. This is useful so you can make certain bordered off areas, quiet. Below is a picture diagram to show you exactly what we mean:
__________________________________________________________________
BASIC POLYGON CONSTRUCTION RULES:
• Plot points in a clockwise manner (I can't stress this enough).
• You connect a polygon to another polygon during construction. To connect, plot a point down on another point when it sub-highlights, then that polygon will connect to the other polygon. If you miss and don't want to erase and do it again, then use the hammer tool to drag the point to where it is supposed to connect, and it will. I do this many times, cause my eyes are bad.
• Never push a point to make a concave angle within a polygon (see fig.b1 below).
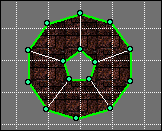
• Making a pillar in the middle of the room is not done by putting a polygon in the middle of another polygon. That creates a 5D room and will never be seen. You must create many polygons in a circle to make a pillar (see fig.b2 below).
• Only eight points per polygon. If you get a beep when you use the hammer tool on the side of a polygon that has eight points already, it's because it won't let you add anymore points. Likewise, only three points minimum for a polygon.
• To add a small door on a long side of a polygon, use the hammer tool to add addition points on that side(if you can) to be able to connect the next polygon to.
• The hammer tool can only put points on outside lines, the ones that are thick green. Thin white lines or thin red lines are not affected by the hammer tool. The hammer can still drag any point.
• Standard Building heights are in chunks of 8bit numbers. For instance, 1024 is the length of a texture, and is the perfect height of a hallway. Consider one story, one texture length, or 1024. Step sizes should be no larger than a fourth of a story, 256. Try to avoid using clean numbers like 1000 or 2500, and so forth, because it makes for ugly texture alignments, and doesn't look right all together. Stay with the 8bit numbers and divide from there. And easy neat thing to do is write out a list of numbers in eighths, starting at 0 then 128, 256... 1024... 2048...etc etc. that way you can quickly reference and not have to use a calculator all the time. But if you really want to be daring, there is nothing holding you back to using 10's like 1000 or 2000. A player can enter a room as low as 824pts high... so you can make some pretty short halls and rooms.
• Plot more than three polygons to make a map that works. Many times people plot one polygon down, and test it, and then get flustered as to why nothing is working correctly.
• CLOCKWISE CLOCKWISE CLOCKWISE! I cannot stress this enough. If you don't know what clockwise means, then look at an old clock and look which way the hands are moving!