Defend This!
From Kaz Ota (ko16@cornell.edu):
If you can't get past the large trash-compactor-like room in
the very beginning of the level, be sure to observe Leela's
briefing map VERY carefully. You will see where the hidden
door out of the compactor is.
Still can't find it?
It's a little to the right of the topleft corner of the
compactor area. Tab there to open the hidden door, and wait
a while until the compactor comes up enough so you can step out
From Rich Garrett (rgg@telerama.lm.com):
In the passage with the two soldiers on the ledges above you,
[Ed: immediately after the large room mentioned above] there are two stairways at the end of the hall. The one going straight
leads to a room with a pattern buffer, shield generator and
MA-75s and ammo. Go up the one to the right. When you open
the door at the top you will be in a room which is white with
an orange band running around the middle. You can see another room like it ahead of you. There is actually a third room which is directly opposite the radiation door. Inside are two MA-75 rounds and a terminal that gives you a message from poor,
beleaguered Tycho.
From Robert James (james@mte.ncsu.edu):
There is a stash of ammo in a corridor in the room that
looks like a bridge. To reach the ammo requires some
grenades. I was only able to get up there by using
Marathon Cheater and getting invincible:
1) Kill the aliens on the bridge and the three in the
corridor openings in the walls.
2) Grenade hop over the left (as you enter the room)
wall of the bridge.
3) Grenade hop into one of the two corridor openings
high above you in the wall (use the map to
line up if you need to).
4) When you get the ammo, run out one of the openings
and land on the bridge. Continue on.
The room:
----------------------------------
| ammo |
| ------------ ------------ |
| | | | | |
----------------------------------- | |
| | | |
| pit | | |
----------------------------------------| |
| |
in bridge out | |
---------------------XXXXX------YY------| |
| pit | | |
| |--| |
| Z |
| |-----|
------------------------------------
Chris Lam (amcw@aston.ac.uk) offers the following advice:
No cheats needed here. First gernade-jump BACKWARDS onto the raised wall of the bridge (marked XXXXX). You lose no strength
but make sure you don't fall into the pit. Now move towards
YY and get in position to gernade-jump up to the ledge marked Z.
Make sure your grenade hits the ledge you're running along
otherwise you'll get no upward lift. Land safely at Z and
collect ammo (deserves more I reckon).
In the room with the 4 switches and the blue and white striped door, the best way I found for getting past the door is this: while facing away from the door, hit the rightmost switch, which temporarily opens the leftmost panel of the door (if facing the door). Get yourself 'wedged' in that space, and turn back to the switches, and without moving, launch a grenade at the second one from the right. Turn around, and just hit the keys for running forward. After a second, the panel to the right will drop, and you should make it through the door. Alternatively, Anthony R. Stevens (STEVENSA@AUSVM1.VNET.IBM.COM) offers the following solution:
Ignore the leftmost switch (when facing the switches). Flip the 2nd from the left. Go over and flip the rightmost. Now flip the
2nd from the right turnaround quickly and head for the opening
before it closes. You will need to fire a grenade at this same switch to get back out.
In another part of the level where there are 4 switches and a window that overlooks lots of platforms, all you need to do is pull the 2nd switch on the left facing the switches. This will make crossing the platforms easy. (Also from Anthony R. Stevens
(STEVENSA@AUSVM1.VNET.IBM.COM))
****************************************************
Couch Fishing
Jeremy P. Condit (afn02635@freenet.ufl.edu) notes that there is an
ammo stash at the end of one of the lengthy vertical corridors (not
the one you start in).
In the large rooms with the ledges that you have to walk around, don't forget to drop down into the open areas to pick up some ammo. Elevators back to the walkway level are located near the point where you entered the room.
****************************************************
The Rose
The only way to 'successfully' complete the level requires that you
immediately head left from the entry point to where the window overlooks the recreation area, and to kill the Hulks and the Fighters while at that vantage point.
From Kaz Ota (ko16@cornell.edu):
There are 3 secret sections. These are all shown in Leela's
briefing map. Look closely!
Still can't find them?
One is the second spiral staircase that you can access from
the notch next to the shield generator, pretty close to the
transport terminal. On these stairs, there is some ammo and
a second .44 magnum. You can activate the second pistol by
using the second weapon key.
The second is along the left wall of this secret spiral
staircase, and contains a terminal where you see some
computer (actually Durandal) cracking up.
The third is along the stem, right under the left leaf, and
also contains a terminal that displays text that supports
the storyline, along with some ammo.
****************************************************
Smells Like Napalm, Tastes Like Chicken
There is a secret room in the level that contains the flame thrower, however, you need to be VERY quick to get both in to and out of the room, so using a saved game to attempt this is recommended. Go into the tunnel system on the right-hand side of the map, and head for the bottom left-most point on the map. This should be very close to the initial entry point on the map. Enter this corridor. You should hear an elevator start up. RUN back to the entry room, and on the left side, there will be a section of
platform missing. RUN to this, drop down, RUN and collect
the napalm unit, and RUN back to the elevator. Did I mention that
you need to RUN to get this? :-) It may help to grenade jump
into the elevator passage, instead of weaving your way up
onto the ledge.
The final puzzle on this level is a bit tricky. Both elevators
are initially at their lowest position, and each button activates
one elevator. The easiest way to do this is to start at the button
that is on the east side, hit it, run to the west button, hit it,
then return to the elevators and move into the alcove as fast
as possible. If done correctly, the first elevator will rise and
stop at the same level as the other elevator, which you must
transfer to in order to get to the final room.
****************************************************
Cool Fusion
To get out of the first room, with the inactive half open doors,
grab the grenade packs, load up your MA-75, aim at a switch that
can be seen through the doors, slightly up from normal aim, and fire a grenade. The switch should be hit, and the door should open.
To get to the pattern buffer and shield generator that are located
on a platform far away, you need to first activate the first
platform in 'The Wave,' and then run and jump off onto the ledge
before you get squished.
To get into the second level opening in the first room, you first
need to get the large octagonal elevator to work. Once that is
going, the best way to get to the opening is to stand on the
opposite of the room from the upper doorway. As the elevator starts to come down, move forward and get a step or two on top of it. Then, when the elevator is moving back up and the floor of the upper hallway is roughly at eye level, RUN forward. You may need to adjust your timing - if you wait too long, you'll get squished.
****************************************************
G4 Sunbathing
The only 'vacuum' level in the game (unfortunately), this one can
pose several problems to the novice. The best way to think of this level is as having an outer ring, an inner ring, and the airlock system in the center. Within the inner ring is a shield regen, an oxygen tank, and a pattern buffer, so one can always return here to
get back to full power.
To complete the level, you need to work clockwise from the entry point on the level to the antenna. Furthermore, you can divide the
level into 4 sublevels, each centered around the 4 large areas.
As the first task, you should circle around the upper right quadrant of the level, looking for a red button while dodging the aliens from the large open area. When you hit the button, look across the large open area, and you will see waayyy on the other side, in the alcove opposite you, lights coming on and a door opening. This can be accessed by returning to the inner ring. Within this newly accessible alcove, there will be a switch that will fully open the necessary doors to get to the next section, namely the lower right quadrant.
Repeat this procedure, looking for a button and then hitting the switch in the newly opened area, for the two lower quadrants. When you complete the 3rd section, the 4th section should be fully open to you now. The rest of the level is very simple.
If you do happen to fall into the large open areas, you need to
pass through the airlock system to return to the inner ring.
There is some ammo down there, so a trip to the bottom level will
not hurt.
And now for the G4 Sunbathing solution by Joe Ashear (rendererer@aol.com):
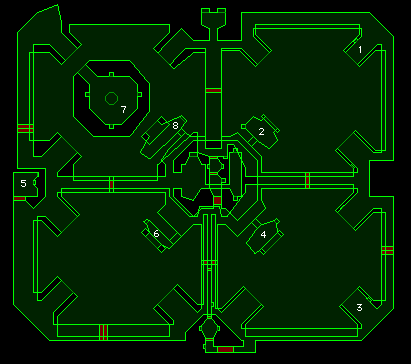
To finish this level, all you have to do is flip a bunch of switches. This is confusing at first, because most of the switches are hidden or inoperative when you begin the level. Each switch makes the next switch available to you.
You do not have to go the large arenas full of aliens. But of course you will run into bad guys as you go, and you will have to replenish your oxygen more than once.
This map shows where all of the switches are loacted, and also shows the proper sequence to follow. Just go to switch #1, #2, and so on. You can replenish your oxygen, shields, and save the game in the rooms at the center of the level.
[Joe Ashear • rendererer@aol.com]
****************************************************
Blaspheme Quarantine
You've cleared out the large square hallway, including the aliens on that ledge, but now you don't see anywhere to go? Find the
elevator that will take you up a level (activated by the switch
near the light switch on one side of the level). Then, while
running, jump across to the ledge, and head to the left. If
done correctly, a door should have opened leading you into the next
part of the level, with a supply of ammo just inside to the left.
Now you've cleared out the other square area, and are stuck
down in a pit? Then go to the center of the west wall and
look for a door. This will reveal a long corridor that will take
you back to the first part of the level, and the door to the final
room will be open.
As an added bonus, you can get to read the lyrics to the Durandel
song! After you return to the first part of the level, redo the
level (no monsters this time, of course), and when you get to the
room with all the elevating platforms, go to the computer terminal and read what Durandel has to say. Note: make sure your shields are charged before reading, because Durandel will jump you from here to the next level.
From Roger Carlson (Roger_Carlson@atdmac.sp.trw.com):
If you have worked your way through the level a second time,
you'll find that on the terminal in the elevator room, Durandal
is singing. He also asks what you are still doing on the level,
looking around the storage room for extra ammo? Would anyone keep ammo in a storage room?
Would Durandal lie?
No way. This is a tricky room to find. It takes running and
timing, and a bit of luck. The elevators have to be working
for you. There is a secret door near where you come in. Walk
forward from where you come in, and it is behind your left
shoulder on the curving wall. To open it, you need to touch
the left hand wall by the transporter booth. You will hear an
activation noise when you do that. You need to run back and
catch the elevator at the right time. The door is only open
for a moment, and soon closes automatically with no way out.
It's a pretty good ammo stash, but more importantly, finding
the room will restore your faith in Durandal. He'd never kid
about ammo.
On the part of Blaspheme Quarantine after the quarantine chamber,
if you jump up onto the back right side of the sniper ledges
(near the X's), you will open up a secret door just to the right
of where you came in (near the Y). Behind the door is two rooms
with ammo a-plenty and a terminal with a message from
Tycho.

Next Chapter
From Kaz Ota (ko16@cornell.edu):
If you can't get past the large trash-compactor-like room in
the very beginning of the level, be sure to observe Leela's
briefing map VERY carefully. You will see where the hidden
door out of the compactor is.
Still can't find it?
It's a little to the right of the topleft corner of the
compactor area. Tab there to open the hidden door, and wait
a while until the compactor comes up enough so you can step out
From Rich Garrett (rgg@telerama.lm.com):
In the passage with the two soldiers on the ledges above you,
[Ed: immediately after the large room mentioned above] there are two stairways at the end of the hall. The one going straight
leads to a room with a pattern buffer, shield generator and
MA-75s and ammo. Go up the one to the right. When you open
the door at the top you will be in a room which is white with
an orange band running around the middle. You can see another room like it ahead of you. There is actually a third room which is directly opposite the radiation door. Inside are two MA-75 rounds and a terminal that gives you a message from poor,
beleaguered Tycho.
From Robert James (james@mte.ncsu.edu):
There is a stash of ammo in a corridor in the room that
looks like a bridge. To reach the ammo requires some
grenades. I was only able to get up there by using
Marathon Cheater and getting invincible:
1) Kill the aliens on the bridge and the three in the
corridor openings in the walls.
2) Grenade hop over the left (as you enter the room)
wall of the bridge.
3) Grenade hop into one of the two corridor openings
high above you in the wall (use the map to
line up if you need to).
4) When you get the ammo, run out one of the openings
and land on the bridge. Continue on.
The room:
----------------------------------
| ammo |
| ------------ ------------ |
| | | | | |
----------------------------------- | |
| | | |
| pit | | |
----------------------------------------| |
| |
in bridge out | |
---------------------XXXXX------YY------| |
| pit | | |
| |--| |
| Z |
| |-----|
------------------------------------
Chris Lam (amcw@aston.ac.uk) offers the following advice:
No cheats needed here. First gernade-jump BACKWARDS onto the raised wall of the bridge (marked XXXXX). You lose no strength
but make sure you don't fall into the pit. Now move towards
YY and get in position to gernade-jump up to the ledge marked Z.
Make sure your grenade hits the ledge you're running along
otherwise you'll get no upward lift. Land safely at Z and
collect ammo (deserves more I reckon).
In the room with the 4 switches and the blue and white striped door, the best way I found for getting past the door is this: while facing away from the door, hit the rightmost switch, which temporarily opens the leftmost panel of the door (if facing the door). Get yourself 'wedged' in that space, and turn back to the switches, and without moving, launch a grenade at the second one from the right. Turn around, and just hit the keys for running forward. After a second, the panel to the right will drop, and you should make it through the door. Alternatively, Anthony R. Stevens (STEVENSA@AUSVM1.VNET.IBM.COM) offers the following solution:
Ignore the leftmost switch (when facing the switches). Flip the 2nd from the left. Go over and flip the rightmost. Now flip the
2nd from the right turnaround quickly and head for the opening
before it closes. You will need to fire a grenade at this same switch to get back out.
In another part of the level where there are 4 switches and a window that overlooks lots of platforms, all you need to do is pull the 2nd switch on the left facing the switches. This will make crossing the platforms easy. (Also from Anthony R. Stevens
(STEVENSA@AUSVM1.VNET.IBM.COM))
****************************************************
Couch Fishing
Jeremy P. Condit (afn02635@freenet.ufl.edu) notes that there is an
ammo stash at the end of one of the lengthy vertical corridors (not
the one you start in).
In the large rooms with the ledges that you have to walk around, don't forget to drop down into the open areas to pick up some ammo. Elevators back to the walkway level are located near the point where you entered the room.
****************************************************
The Rose
The only way to 'successfully' complete the level requires that you
immediately head left from the entry point to where the window overlooks the recreation area, and to kill the Hulks and the Fighters while at that vantage point.
From Kaz Ota (ko16@cornell.edu):
There are 3 secret sections. These are all shown in Leela's
briefing map. Look closely!
Still can't find them?
One is the second spiral staircase that you can access from
the notch next to the shield generator, pretty close to the
transport terminal. On these stairs, there is some ammo and
a second .44 magnum. You can activate the second pistol by
using the second weapon key.
The second is along the left wall of this secret spiral
staircase, and contains a terminal where you see some
computer (actually Durandal) cracking up.
The third is along the stem, right under the left leaf, and
also contains a terminal that displays text that supports
the storyline, along with some ammo.
****************************************************
Smells Like Napalm, Tastes Like Chicken
There is a secret room in the level that contains the flame thrower, however, you need to be VERY quick to get both in to and out of the room, so using a saved game to attempt this is recommended. Go into the tunnel system on the right-hand side of the map, and head for the bottom left-most point on the map. This should be very close to the initial entry point on the map. Enter this corridor. You should hear an elevator start up. RUN back to the entry room, and on the left side, there will be a section of
platform missing. RUN to this, drop down, RUN and collect
the napalm unit, and RUN back to the elevator. Did I mention that
you need to RUN to get this? :-) It may help to grenade jump
into the elevator passage, instead of weaving your way up
onto the ledge.
The final puzzle on this level is a bit tricky. Both elevators
are initially at their lowest position, and each button activates
one elevator. The easiest way to do this is to start at the button
that is on the east side, hit it, run to the west button, hit it,
then return to the elevators and move into the alcove as fast
as possible. If done correctly, the first elevator will rise and
stop at the same level as the other elevator, which you must
transfer to in order to get to the final room.
****************************************************
Cool Fusion
To get out of the first room, with the inactive half open doors,
grab the grenade packs, load up your MA-75, aim at a switch that
can be seen through the doors, slightly up from normal aim, and fire a grenade. The switch should be hit, and the door should open.
To get to the pattern buffer and shield generator that are located
on a platform far away, you need to first activate the first
platform in 'The Wave,' and then run and jump off onto the ledge
before you get squished.
To get into the second level opening in the first room, you first
need to get the large octagonal elevator to work. Once that is
going, the best way to get to the opening is to stand on the
opposite of the room from the upper doorway. As the elevator starts to come down, move forward and get a step or two on top of it. Then, when the elevator is moving back up and the floor of the upper hallway is roughly at eye level, RUN forward. You may need to adjust your timing - if you wait too long, you'll get squished.
****************************************************
G4 Sunbathing
The only 'vacuum' level in the game (unfortunately), this one can
pose several problems to the novice. The best way to think of this level is as having an outer ring, an inner ring, and the airlock system in the center. Within the inner ring is a shield regen, an oxygen tank, and a pattern buffer, so one can always return here to
get back to full power.
To complete the level, you need to work clockwise from the entry point on the level to the antenna. Furthermore, you can divide the
level into 4 sublevels, each centered around the 4 large areas.
As the first task, you should circle around the upper right quadrant of the level, looking for a red button while dodging the aliens from the large open area. When you hit the button, look across the large open area, and you will see waayyy on the other side, in the alcove opposite you, lights coming on and a door opening. This can be accessed by returning to the inner ring. Within this newly accessible alcove, there will be a switch that will fully open the necessary doors to get to the next section, namely the lower right quadrant.
Repeat this procedure, looking for a button and then hitting the switch in the newly opened area, for the two lower quadrants. When you complete the 3rd section, the 4th section should be fully open to you now. The rest of the level is very simple.
If you do happen to fall into the large open areas, you need to
pass through the airlock system to return to the inner ring.
There is some ammo down there, so a trip to the bottom level will
not hurt.
And now for the G4 Sunbathing solution by Joe Ashear (rendererer@aol.com):
To finish this level, all you have to do is flip a bunch of switches. This is confusing at first, because most of the switches are hidden or inoperative when you begin the level. Each switch makes the next switch available to you.
You do not have to go the large arenas full of aliens. But of course you will run into bad guys as you go, and you will have to replenish your oxygen more than once.
This map shows where all of the switches are loacted, and also shows the proper sequence to follow. Just go to switch #1, #2, and so on. You can replenish your oxygen, shields, and save the game in the rooms at the center of the level.
[Joe Ashear • rendererer@aol.com]
****************************************************
Blaspheme Quarantine
You've cleared out the large square hallway, including the aliens on that ledge, but now you don't see anywhere to go? Find the
elevator that will take you up a level (activated by the switch
near the light switch on one side of the level). Then, while
running, jump across to the ledge, and head to the left. If
done correctly, a door should have opened leading you into the next
part of the level, with a supply of ammo just inside to the left.
Now you've cleared out the other square area, and are stuck
down in a pit? Then go to the center of the west wall and
look for a door. This will reveal a long corridor that will take
you back to the first part of the level, and the door to the final
room will be open.
As an added bonus, you can get to read the lyrics to the Durandel
song! After you return to the first part of the level, redo the
level (no monsters this time, of course), and when you get to the
room with all the elevating platforms, go to the computer terminal and read what Durandel has to say. Note: make sure your shields are charged before reading, because Durandel will jump you from here to the next level.
From Roger Carlson (Roger_Carlson@atdmac.sp.trw.com):
If you have worked your way through the level a second time,
you'll find that on the terminal in the elevator room, Durandal
is singing. He also asks what you are still doing on the level,
looking around the storage room for extra ammo? Would anyone keep ammo in a storage room?
Would Durandal lie?
No way. This is a tricky room to find. It takes running and
timing, and a bit of luck. The elevators have to be working
for you. There is a secret door near where you come in. Walk
forward from where you come in, and it is behind your left
shoulder on the curving wall. To open it, you need to touch
the left hand wall by the transporter booth. You will hear an
activation noise when you do that. You need to run back and
catch the elevator at the right time. The door is only open
for a moment, and soon closes automatically with no way out.
It's a pretty good ammo stash, but more importantly, finding
the room will restore your faith in Durandal. He'd never kid
about ammo.
On the part of Blaspheme Quarantine after the quarantine chamber,
if you jump up onto the back right side of the sniper ledges
(near the X's), you will open up a secret door just to the right
of where you came in (near the Y). Behind the door is two rooms
with ammo a-plenty and a terminal with a message from
Tycho.
Next Chapter