Building In Pfhorte!
Some Basics
Using Pfhorte! is very similar to drawing in one of the popular 'vector graphics' drawing programs used by graphic's professionals--like Macromedia FreeHand, Adobe Illustrator, or Corel Draw!. All your drawing is based on 'points' and 'lines'.
When you select the Polygon Tool, and click once on the Map Window, a point appears where you click. Moving the mouse after you create a point will show an elastic 'line' which follows your mouse around the screen, growing and contracting in relation to the first point. When you click a second time, the line between the first two points solidifies, and you again have control of an 'elastic' line anchored at the second point you created. This process is repeated until you double-click, or until you click on the original point. When you do that, you've created a very important element of Marathon map--a polygon!
Polygons are our 'friends'
Marathon's basic "building block" is the polygon (or 'poly', as you've probably already gathered). Every map is made up of dozens and dozens of polygons connected together to make hallways, rooms, etc.
Because of the way Marathon's engine operates, a Map is designed in 2D. You cannot "model" a three-dimensional room by creating a 3D cube and sticking other 3D cubes onto it or inside it, as you would in a 3D program like InfiniD or Ray Dream Designer. Instead, you create polygons outlining a room's boundaries, or walls. You then tell Marathon the height of the floor and the height of the ceiling. You link these polygons together, creating pseudo-3D structures by defining different floor and ceiling heights.
Ledges are simply polygons whose floor heights are higher than the rest of the room. Staircases are hallways whose floor heights go up or down. Platforms and doors are "special cases"--regular polygons whose ceiling heights and floor heights can change dynamically. A door, for example, is just another 2D polygon in a map, connecting two larger rooms. But when you are playing the game, and you walk up to a 'door', and hit the action key, its ceiling height changes and it appears to slide upward, allowing you to pass.
Polygons must always have between 3 and 8 sides. They also must be drawn in a clockwise fashion, and in such a way that all interior angles are less than or equal to 180 degrees and greater than 15 degrees.
Fortunately, polygons can be connected together along their sides. Only two polygons can be connected together along any one side. This means that you cannot have a room connecting along one wall and another room or window higher up on that same wall. When two polygons are connected, the wall between them is not drawn so that the player can walk and shoot between polys. If the floor height or ceiling height of the polygons are not the same, then small walls will fill in those gaps in elevation and still leave an opening between the polygons. This is how stairs or windows are made.
Each polygon also has a separate floor light and ceiling light. For more explanation on lighting types, and how to set them, see the section on 'Lighting'.
Pfhorte! also allows you to make polygons with more than 8 points and it will automatically split this polygon up into smaller connected polygons for you.
Double clicking on a polygon brings up the Edit Polygon dialog. Here you can change most of the characteristics of the polygon. A small image of the polygon is shown with each side numbered. For sides that are walls you can click on the edit button for that wall to bring up the side editor dialog. You can also click on the 'Solid' check box to have a non-existent wall (window) repel shots.
Pseudo-3D: Smoke and Mirrors
 "But wait," you cry! "That sounds like the way DOOM does things! I thought Marathon's engine was superior to Doom's, able to do 'real' 3D maps!" You're right, partially. Marathon is capable of creating maps with rooms on top of one another. But it's all smoke and mirrors.Understanding that is the key to
understanding map creation.
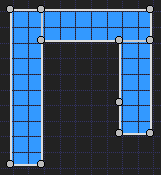
Picture a flat map, with no elevation changes. It's shaped
like a big "U".
If you twist one side of the "U" around, so that it overlaps
the other side, you will have two polygons that occupy
the VERY same space in the "world."

However, when you open that map in
Marathon, you won't see the second hallway
when you're in the first one. They are two
separate "rooms," even though they occupy
the same space in Marathon's "universe."
What happens when you change the
elevation of one of those rooms, though?
Suddenly, you have two rooms that are
on top of each other as far as play is
concerned. Although the actual map defines them as 2D spaces that overlap,
the Marathon engine turns them into 3D rooms on different "floors" of a structure.
�
Scale and Units of Measure:
Your character is roughly 819 units tall. Making rooms shorter than this will keep your character from entering those rooms normally. The highest you can normally step (for stairs, etc.) is around 345. I say normally in all my size quotes because by playing with the physics editor you can change a number of these constants.
Some Statistics(default physics file*):
Highest step you can make: 345 (340-345)
Lowest ceiling height you can enter: 819
Texture Block Width x Height: 1024x1024
Note: These statistics are true only for the default Physics Module. Any editing you do to a
physics module can affect all these parameters.
�
Types of Polygons
These are the various types of polys which can be used in Marathon. You can set the type of the poly in two places: the Edit Polygon dialog (brought up by double-clicking on the poly), or the Inspector palette (when a poly is selected).
Normal: This is your average hunk of floor/ceiling etc.
Item Impassable: Randomly placed items will not appear in these polygons.
Monster impassable: Monsters generally stay out of these squares. They will follow you through them, however.
Major Damage: Will cause very rapid damage to a player in this poly, and will make it difficult to see.
Minor Damage: Will cause slow damage to a player in this poly, and will make it difficult to see.
Platform: A door, elevator, trash compactor, etc. See the section on Platforms for more information.
Light on/off: Sets a poly so that stepping in it will turn a light on or off. Option-drag on a poly with this setting to define the poly whose light level is affected.
Platform on/off: Sets a poly so that stepping on it turns a platform on or off.
Teleporter: Will send you some where else only if you stop on this poly. If you keep moving, you don't transport.
You can Option-drag on this poly to determine the destination poly of your teleport.
�
Glue Trigger and (Super) Glue: These settings are used to set triggers, which activate aliens, or boundaries for triggers, defining which aliens you activate.
First of all, when a player crosses a polygon set as a Glue Trigger, that trigger
emits a 'signal'. Glue Trigger 'signals' propagate not in a radial fashion (like
ripples on a pond) but from polygon to polygon, following all possible paths
around your map. Differences in height between the polys do not matter. As
long as a poly is connected to another polygon, Glue Trigger signals will be
sent from one to the other.
However, a SuperGlue polygon will block the signal. By "sealing" the exits from
an area using SuperGlue polygons you can limit the effect of a Glue Trigger. In
this way, you can have as many glue-triggered areas as you like. Be sure, for
best results, that no aliens are placed directly on the SuperGlue polys.
Example: If you look at the area where the machine gun is found on level 2 of
Marathon, you'll see a very good example of Glue Trigger and SuperGlue. The
Glue Trigger that activates the aliens in the machine gun room is surrounded on
either side by SuperGlue polygons, to prevent anything else from being triggered.
(Consequently, if you don't put in any SuperGlue polygons, or if you fail to block all
possible exits from the triggered area, a Glue Trigger will affect all Glue polygons
in your map.)
Secondly, the Glue polygons absorb the "alert" sound that the aliens make. This
sound, too, will be sent from alien to alien, and if you are not careful you might end
up with all aliens on the level suddenly coming after you. Glue polygons will
"muffle" this the alien alert sound, in exactly the same way as SuperGlue polygons
"muffle" the Glue Trigger.
This means that you can use Glue polygons to seal off a battle area. Glue polygons
placed at the exits of the area will prevent other aliens from noticing what is going
on, with one exception: if they can see what's happening, they will come anyway.
�
Here's a good example of what use of a Glue polygon might look like:
+------------------------+
| |
+------+ |
| Y G P |
| +-+ |
| | | Z |
| | +------------------------+
| |
| X | (P=Player, X,Y,Z=aliens, G=Glue)
If G is a Glue Square, then X and Y won't hear the call of Z. However, You can see
the player, P, and therefore will enter the room and attack, possibly also alerting X,
who will follow Y into the room to attack P. If Y is removed altogether, then X won't
activate until P leaves the room and enters the corridor.
Glue polygons are used over and over again in the Marathon map to subdivide a
level into a neat sequence of smaller battles. A good example is the level
mentioned above. For instance, on one side of the SuperGlue polygons near the
machine gun is a Glue polygon whose sole task is to keep the two aliens in the
next room where they are until the player enters their room.
�Must be explored: When Exploration is checked as a goal in the Mission Info dialog, this (or these) polys must be crossed by the player to be able to exit the level.
Exit: Going to a polygon with this setting after completing the goals for this level will teleport you to another level. The level you are teleported to can be entered in the Edit Polygon dialog box (which can be reached by double-clicking on the 'exit' polygon).
Drawing Modes
These are various settings which affect how the textures which make up a polygon are drawn or animated. They are as follows:
Normal: Normal stationary textures.
Fade to Black:
Invisible:
Sub Invisible:
Pulsate: The textures seem to move in an out, as if they were breathing.
Wobble: The texture moves from left to right.
Fast Wobble: The textures move from left to right REAL fast.
Static: The texture looks like you do with an invincibility, or like that TV on
Poltergeist.
When you choose static, the 'static' overrides whatever texture you
selected for the polygon.
Note: When static is used on floors and ceilings it dramatically slows down play speed.
Sub Static:
Landscape: This option creates a texture that appears not to move with the
player. Landscape makes the texture appear as if it were far in the
distance. In the original levels, this option is used to create the star
background seen outside the ship.
Smear:
Fade-Out Static:
Fold-In:
Fold Out:
Horizontal Slide: This options causes the texture to scroll smoothly from left to
right.
Fast Horizontal side: Same as above, but faster.
Vertical Slide: This option causes the texture to scroll from top to bottom.
Fast Vertical Slide: Same as above, but faster.
Wander: Causes the texture to move up, down, right and left in a random
combination.
Fast Wander: Same as above but faster.
Some Basics
Using Pfhorte! is very similar to drawing in one of the popular 'vector graphics' drawing programs used by graphic's professionals--like Macromedia FreeHand, Adobe Illustrator, or Corel Draw!. All your drawing is based on 'points' and 'lines'.
When you select the Polygon Tool, and click once on the Map Window, a point appears where you click. Moving the mouse after you create a point will show an elastic 'line' which follows your mouse around the screen, growing and contracting in relation to the first point. When you click a second time, the line between the first two points solidifies, and you again have control of an 'elastic' line anchored at the second point you created. This process is repeated until you double-click, or until you click on the original point. When you do that, you've created a very important element of Marathon map--a polygon!
Polygons are our 'friends'
Marathon's basic "building block" is the polygon (or 'poly', as you've probably already gathered). Every map is made up of dozens and dozens of polygons connected together to make hallways, rooms, etc.
Because of the way Marathon's engine operates, a Map is designed in 2D. You cannot "model" a three-dimensional room by creating a 3D cube and sticking other 3D cubes onto it or inside it, as you would in a 3D program like InfiniD or Ray Dream Designer. Instead, you create polygons outlining a room's boundaries, or walls. You then tell Marathon the height of the floor and the height of the ceiling. You link these polygons together, creating pseudo-3D structures by defining different floor and ceiling heights.
Ledges are simply polygons whose floor heights are higher than the rest of the room. Staircases are hallways whose floor heights go up or down. Platforms and doors are "special cases"--regular polygons whose ceiling heights and floor heights can change dynamically. A door, for example, is just another 2D polygon in a map, connecting two larger rooms. But when you are playing the game, and you walk up to a 'door', and hit the action key, its ceiling height changes and it appears to slide upward, allowing you to pass.
Polygons must always have between 3 and 8 sides. They also must be drawn in a clockwise fashion, and in such a way that all interior angles are less than or equal to 180 degrees and greater than 15 degrees.
Fortunately, polygons can be connected together along their sides. Only two polygons can be connected together along any one side. This means that you cannot have a room connecting along one wall and another room or window higher up on that same wall. When two polygons are connected, the wall between them is not drawn so that the player can walk and shoot between polys. If the floor height or ceiling height of the polygons are not the same, then small walls will fill in those gaps in elevation and still leave an opening between the polygons. This is how stairs or windows are made.
Each polygon also has a separate floor light and ceiling light. For more explanation on lighting types, and how to set them, see the section on 'Lighting'.
Pfhorte! also allows you to make polygons with more than 8 points and it will automatically split this polygon up into smaller connected polygons for you.
Double clicking on a polygon brings up the Edit Polygon dialog. Here you can change most of the characteristics of the polygon. A small image of the polygon is shown with each side numbered. For sides that are walls you can click on the edit button for that wall to bring up the side editor dialog. You can also click on the 'Solid' check box to have a non-existent wall (window) repel shots.
Pseudo-3D: Smoke and Mirrors
understanding map creation.
Picture a flat map, with no elevation changes. It's shaped
like a big "U".
If you twist one side of the "U" around, so that it overlaps
the other side, you will have two polygons that occupy
the VERY same space in the "world."
However, when you open that map in
Marathon, you won't see the second hallway
when you're in the first one. They are two
separate "rooms," even though they occupy
the same space in Marathon's "universe."
What happens when you change the
elevation of one of those rooms, though?
Suddenly, you have two rooms that are
on top of each other as far as play is
concerned. Although the actual map defines them as 2D spaces that overlap,
the Marathon engine turns them into 3D rooms on different "floors" of a structure.
�
Scale and Units of Measure:
Your character is roughly 819 units tall. Making rooms shorter than this will keep your character from entering those rooms normally. The highest you can normally step (for stairs, etc.) is around 345. I say normally in all my size quotes because by playing with the physics editor you can change a number of these constants.
Some Statistics(default physics file*):
Highest step you can make: 345 (340-345)
Lowest ceiling height you can enter: 819
Texture Block Width x Height: 1024x1024
Note: These statistics are true only for the default Physics Module. Any editing you do to a
physics module can affect all these parameters.
�
Types of Polygons
These are the various types of polys which can be used in Marathon. You can set the type of the poly in two places: the Edit Polygon dialog (brought up by double-clicking on the poly), or the Inspector palette (when a poly is selected).
Normal: This is your average hunk of floor/ceiling etc.
Item Impassable: Randomly placed items will not appear in these polygons.
Monster impassable: Monsters generally stay out of these squares. They will follow you through them, however.
Major Damage: Will cause very rapid damage to a player in this poly, and will make it difficult to see.
Minor Damage: Will cause slow damage to a player in this poly, and will make it difficult to see.
Platform: A door, elevator, trash compactor, etc. See the section on Platforms for more information.
Light on/off: Sets a poly so that stepping in it will turn a light on or off. Option-drag on a poly with this setting to define the poly whose light level is affected.
Platform on/off: Sets a poly so that stepping on it turns a platform on or off.
Teleporter: Will send you some where else only if you stop on this poly. If you keep moving, you don't transport.
You can Option-drag on this poly to determine the destination poly of your teleport.
�
Glue Trigger and (Super) Glue: These settings are used to set triggers, which activate aliens, or boundaries for triggers, defining which aliens you activate.
First of all, when a player crosses a polygon set as a Glue Trigger, that trigger
emits a 'signal'. Glue Trigger 'signals' propagate not in a radial fashion (like
ripples on a pond) but from polygon to polygon, following all possible paths
around your map. Differences in height between the polys do not matter. As
long as a poly is connected to another polygon, Glue Trigger signals will be
sent from one to the other.
However, a SuperGlue polygon will block the signal. By "sealing" the exits from
an area using SuperGlue polygons you can limit the effect of a Glue Trigger. In
this way, you can have as many glue-triggered areas as you like. Be sure, for
best results, that no aliens are placed directly on the SuperGlue polys.
Example: If you look at the area where the machine gun is found on level 2 of
Marathon, you'll see a very good example of Glue Trigger and SuperGlue. The
Glue Trigger that activates the aliens in the machine gun room is surrounded on
either side by SuperGlue polygons, to prevent anything else from being triggered.
(Consequently, if you don't put in any SuperGlue polygons, or if you fail to block all
possible exits from the triggered area, a Glue Trigger will affect all Glue polygons
in your map.)
Secondly, the Glue polygons absorb the "alert" sound that the aliens make. This
sound, too, will be sent from alien to alien, and if you are not careful you might end
up with all aliens on the level suddenly coming after you. Glue polygons will
"muffle" this the alien alert sound, in exactly the same way as SuperGlue polygons
"muffle" the Glue Trigger.
This means that you can use Glue polygons to seal off a battle area. Glue polygons
placed at the exits of the area will prevent other aliens from noticing what is going
on, with one exception: if they can see what's happening, they will come anyway.
�
Here's a good example of what use of a Glue polygon might look like:
+------------------------+
| |
+------+ |
| Y G P |
| +-+ |
| | | Z |
| | +------------------------+
| |
| X | (P=Player, X,Y,Z=aliens, G=Glue)
If G is a Glue Square, then X and Y won't hear the call of Z. However, You can see
the player, P, and therefore will enter the room and attack, possibly also alerting X,
who will follow Y into the room to attack P. If Y is removed altogether, then X won't
activate until P leaves the room and enters the corridor.
Glue polygons are used over and over again in the Marathon map to subdivide a
level into a neat sequence of smaller battles. A good example is the level
mentioned above. For instance, on one side of the SuperGlue polygons near the
machine gun is a Glue polygon whose sole task is to keep the two aliens in the
next room where they are until the player enters their room.
�Must be explored: When Exploration is checked as a goal in the Mission Info dialog, this (or these) polys must be crossed by the player to be able to exit the level.
Exit: Going to a polygon with this setting after completing the goals for this level will teleport you to another level. The level you are teleported to can be entered in the Edit Polygon dialog box (which can be reached by double-clicking on the 'exit' polygon).
Drawing Modes
These are various settings which affect how the textures which make up a polygon are drawn or animated. They are as follows:
Normal: Normal stationary textures.
Fade to Black:
Invisible:
Sub Invisible:
Pulsate: The textures seem to move in an out, as if they were breathing.
Wobble: The texture moves from left to right.
Fast Wobble: The textures move from left to right REAL fast.
Static: The texture looks like you do with an invincibility, or like that TV on
Poltergeist.
When you choose static, the 'static' overrides whatever texture you
selected for the polygon.
Note: When static is used on floors and ceilings it dramatically slows down play speed.
Sub Static:
Landscape: This option creates a texture that appears not to move with the
player. Landscape makes the texture appear as if it were far in the
distance. In the original levels, this option is used to create the star
background seen outside the ship.
Smear:
Fade-Out Static:
Fold-In:
Fold Out:
Horizontal Slide: This options causes the texture to scroll smoothly from left to
right.
Fast Horizontal side: Same as above, but faster.
Vertical Slide: This option causes the texture to scroll from top to bottom.
Fast Vertical Slide: Same as above, but faster.
Wander: Causes the texture to move up, down, right and left in a random
combination.
Fast Wander: Same as above but faster.